Frequently Asked Questions
General Questions
Playing the Wire–Strung harp
Harp Construction
History and Language:
the Clàrsach or Cláirseach and Gaelic Harp
Resources
General Questions
- Q: Is the wire–strung harp really a harp?
- Yes. It is the traditional harp of the historically Gaelic–speaking areas of Scotland and Ireland.
- Q: Is it true that the strings are made of metal?
- The strings are usually made of brass or bronze. Some harps have steel, and some few use gold or silver (usually in the bass).
- Q: Is breakage a problem with wire strings?
- Most wire harpers do not have trouble with string breakage. Some wire–strung harps never break strings, while others may have more breakage. There is a limit to how much tension any string can take before breaking, and some harps are designed to come nearer that limit than others. This may account for some of the variability between different harps.
- Q: How often do you have to replace the strings?
- It is never necessary to replace the strings on a wire–strung harp unless they break. Metal strings do not wear out because they are not affected by finger abrasion. An exception might be for harps stored in less–than optimal conditions (such as in a damp basement) where the metal may corrode, but if that is the case then you probably need to do more than just change strings.
- Metal strings are subject to metal–fatigue if the tuning pin is turned back and forth too many times, or if levers are engaged (and un–engaged) often. This may cause a string to break, and then of course it will need to be changed.
- Q: How do you tie a knot in a wire string?
- Wire string typically comes in coils. It is very common on a wire–strung harp for several strings to all be the same thickness, or gauge, so that one coil may last you a lifetime and replace multiple strings. Some string sources will sell pre–tied strings just long enough to replace one string, but it is actually not too difficult to tie the knot yourself.
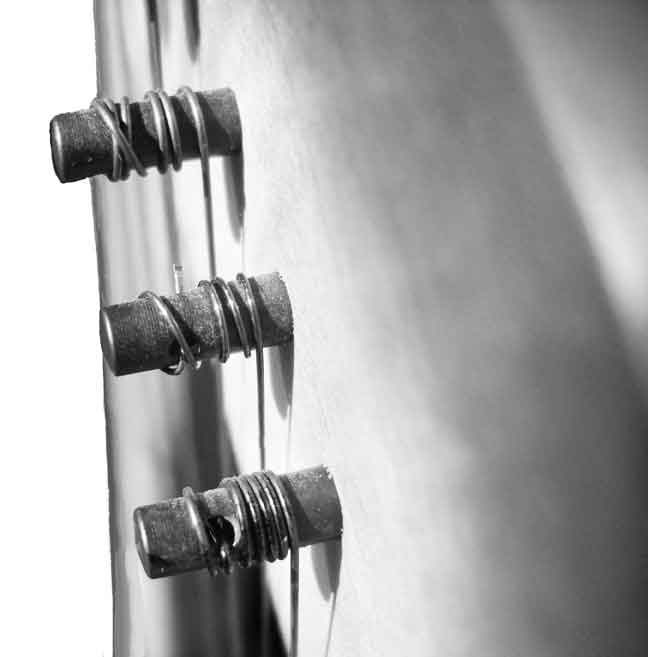
- The key point to remember is that you want to keep the string taught as you tie your knot. You can put your foot on the coil to hold it in place, ask someone to hold the coil for you, or you can also cut off a good length of wire and place one end in a vice to hold it taught. The free end is then tied around a toggle. A toggle can be a bit of wooden dowel ¼ inch in diameter, a thick bit of metal (at least one harpmaker takes finishing nails and cuts the head off), or a thick piece of wire crimped to have a zig–zag in it to help prevent the knot from slipping off.
- The string end is wrapped around the toggle (or “zoggle” in the case of the zig–zag version). Crossing back and forth on either end of the string length, the string in the knot will overlap itself to prevent the knot from pulling loose under tension. The exact number of wraps around the toggle is largely determined by the thickness of the wire. The thicker the wire, generally the fewer wraps. Once the wire is wrapped around the toggle sufficiently, the end is then wound a few times around the vibrating length of the wire, but no more than 4 or 5 wraps around. Too many wraps and the knot will be too long and will come through the soundboard when you install it.
- Knot tying is difficult to describe in text. A video of the process was made a few years ago and is available via this link: Knot Tying for Wire–strung Harp.
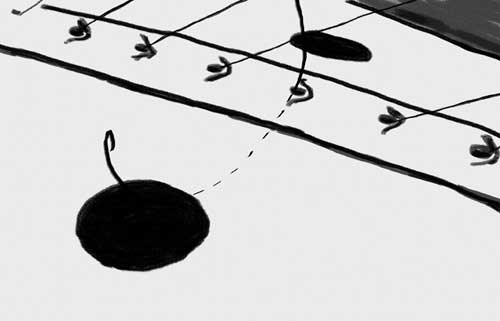
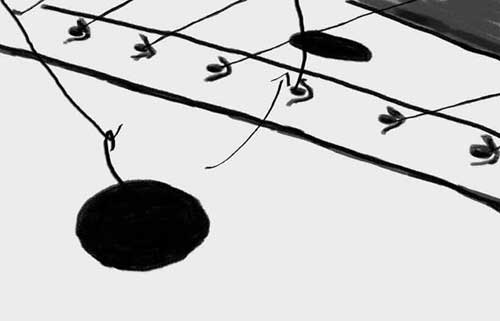
- Q: How do I install the string on the harp once I have the knot tied?
- If your harp’s soundbox has openings in the back, or if it has a solid back which is removable, you can cut the string to the necessary length plus about 3 inches (about 7½ centimeters) and poke the string from the inside of the harp out through the string hole. You then pull the lose end up to wrap it around the pin (this is covered under a separate answer, below).
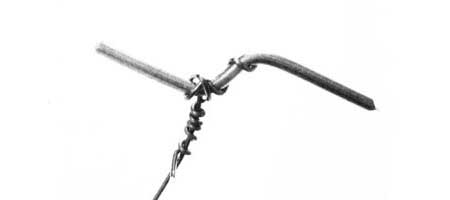
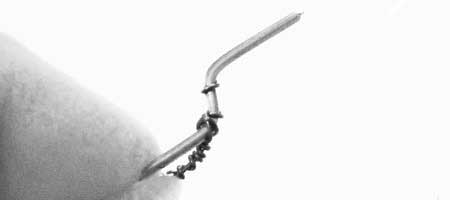
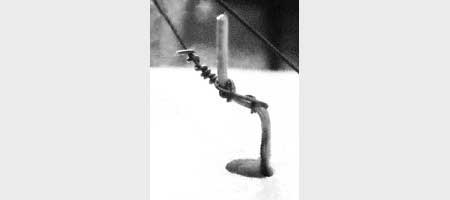
- If you harp has a closed back that is not removable, a different approach is needed. If the toggle around which the wire is tied is smaller than the string hole on your harp, you can poke the toggle in from the front of the harp, much like a molly–bolt.
- (Please click on the above images to view larger versions you can scroll through.)
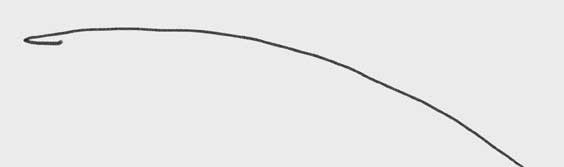
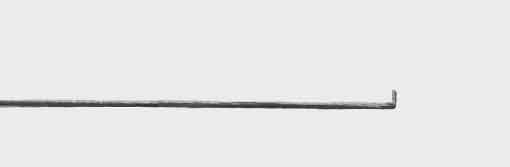
- If the toggle is too big to push through the string hole, you will need to fish it up through one of the sound holes. For this you need a piece of wire made into a hook or “needle”. Take a length of fairly thick wire, and put a hook in one end and poke that in through the string hole. Fish this up through one of the sound holes (bending the “needle” in a curve will help.) Then take the replacement string and make a hook on the end opposite the end with the knot. Hook this onto the “needle” and pull the needle back through the string hole, dragging the replacement string after it.
- (Please click on the above images to view larger versions you can scroll through.)
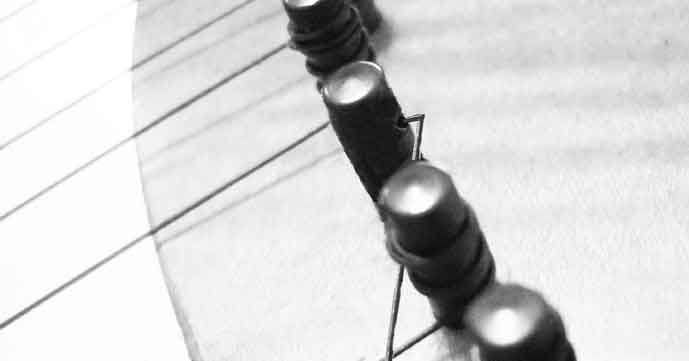
- Q: How do I wrap the string around the tuning pin?
- You will want to cut the replacement string so that you have about 3 inches, or 7½ centimeters, beyond the length needed to reach the pin for the wraps. In Method One, a small crimp of about ¼ inch length, or 5 millimeters, is made in the end of the string. This is placed in the hole on the tuning pin, so the end of the wire will not be exposed. In Method Two, the wire is left straight and and inserted into the pin so that it goes through and comes out the other side. This length you will then fold over along the pin as you wind the pin. Once the wraps are complete, you may choose to trim the protruding end of the wire close to the pin or bend it flat against the pin. Method One is very neat and leaves no sharp ends exposed, but Method Two is easier and requires less patience.
- As you turn the pin with your tuning–key, be very careful to turn the pin so your replacement string is wound in the same direction as all the other strings on your harp. If you are using Method Two described in the previous paragraph, you will perhaps want to overlap the loose end of the wire, though you should be extremely careful not to overlap the last wrap, it must fall directly off the pin. This reduces the risk of string breakage. Also be careful that this final wrap is not touching any previous wraps, as this increases the likelihood of buzzing as the string may vibrate against the previous wrap.
- As you take up the slack of the string and it becomes taught, stop turning the pin and strike the string so it sounds. Carefully begin bringing the string up to pitch.
- (Please click on the above images to view larger versions you can scroll through.)
- Q: My tuning pins are loose! How do I fix this?
- Tuning pins can become loose for several reasons. Sometimes the wood around the pin shrinks as it ages or dries. Sometimes this happens after a string has been replaced. It's generally not anything to worry about, but it does make tuning the harp very difficult. You can often re-seat the pin by pressing on the pin as you push it in: drop the pitch of the string (to give you room to adjust the pin) and then, as you sound the string and bring it back up to pitch, push the pin in with the tuning wrench, while bracing the harp with your other hand opposite the loose pin. A bit difficult to put into words, there is a video on our YouTube channel that demonstrates fixing a loose tuning pin on a wire-strung harp.
- Q: My strings are not as shiny as when they were new. Should I clean them?
- After awhile brass strings can tarnish and darken, though this will not necessarily affect the tone. If desired, their shine can usually be restored with the application of a little metal polish. Use a soft cloth and make sure to buff all residue off afterwards, or you’ll end up with blackened fingers when you play.
- Rusted steel strings should be replaced, though if the rust is very light a quick run up and down with steel wool (or wire wool) can be attempted. The worst that can happen is you will find yourself having to change the strings, and then they will be shiny again!
- Q: Is the wire–strung harp hard to tune?
- Not really, once you get used to the feel of how the strings respond. Wire strings are not nearly as elastic as those made from nylon or gut, and are therefore more sensitive to the action of the tuning key — so a slight turn can cause a significant change in the pitch. Care must be taken not to go too far above the desired pitch because this can overstress the string and cause it to break. Therefore, players should always listen carefully for the pitch as they tune the string.
- For this reason, many wire–strung harpers keep a string ringing while tuning it, so they can listen and stop at the precise point where the string is in tune.
- Q: What is the harp itself made of?
- Most wire strung harps by far are made of wood, but that doesn’t stop some harp makers (luthiers) from trying other materials. Some makers try assorted combinations of woods or other materials.
- Q: How many wire–strung harpers does it take to change a light–bulb?
- Taking some time out for a little comic relief, we thought we might try and answer this age–old question, with a little help from our friends on our Facebook page.
- It takes only one harper to change the light–bulb, but as one bulb in the house is tightened, the others will loosen in response so the harper must move quickly through the house or have some friends over to help. This has led to the old saw, "Wire harpers spend half their time changing light bulbs and the other half playing in the dark."
Playing the Wire–Strung Harp
- Q: What is the tuning scheme for a wire–strung harp or clàrsach?
- Most wire–strung harps are tuned diatonically. This means that they are tuned with one string per “letter name” pitch. So there is one C (or maybe a C–sharp) string, one D (or maybe a D–sharp) string, and so forth.
- Q: What is the most common tuning?
- Most harpers tune either in the key of C (all notes are natural, i.e. there are no sharps or flats, as with using only the white keys of a piano); or in the key of G (the F’s are sharp, the other notes are natural). These are the most commonly used tunings, though in fact you can tune your harp in a variety of ways, depending on your preferences and the type of music you are playing.
- Q: Doesn’t this mean that most wire–strung harps are stuck in one key?
- Any harp tuned in “one key” can play music in two keys, because all major keys have a relative (an “equivalent”) minor. If you are tuned in the key of C Major (all naturals, as described above) you will also have A Minor (though without a raised 7th). Here is a table showing the major/minor key pairings that are most useful for the harp.
- Q: Is it possible to play chromatic notes (sharps and flats) on a wire–strung harp?
- Some wire–strung harps have mechanical pitch–raising devices, such as blades or levers. Other times a harper will simply retune a string to achieve the necessary chromatic tone. Or, you can use alternate tunings between octaves (i.e. tune a particular note sharp or flat in one octave, and natural in another octave so to have both tonalities available).
- There are also historic chromatic versions of these harps, a prime example of which is the Dalway Harp which was built in 1621. So don’t let anyone tell you that only modern harps are chromatic!
- Q: Do wire–strung harps ever have levers?
- Yes, though blades are more common as they put fewer bends on the wire string. (Too much bending of a piece of wire will cause it to break.) Blades sometimes work well, as they place less stress on the string. These mechanical devices tend not to be as common on wire as on nylon and gut strung harps, because the fitting of these devices is a more difficult task on a wire–strung instrument, requiring a greater degree of accuracy and care to set them up correctly. Nevertheless, there are some players who have had them added and will regularly use them during their performance.
- Q: What is this I hear about damping?
- Because the metal strings are very resonant, damping is used to control the ringing. Damping stops the string’s vibration, thus canceling its sound. Most damping on the wire–strung harp is achieved by using “finger damping” as contrasted with whole–hand damping. This type of damping is often part of a single movement that we call “figures”. Once these figures are learned, the motion to strike and damp is performed with very little thought.
- The concept that you can touch a string and then remove your finger in silence is difficult for some players to comprehend. A harper may place a finger on a string of the clàrsach solely for the purpose of damping or anchoring the hand. This may feel unusual to harpers from other traditions, where any finger placed on a string is generally put there in preparation to pluck that string.
- Q: Why do some people play with the harp on their left shoulder while others play it on their right?
- It’s mostly a matter of personal preference. Many people want to play with their dominant hand in the treble, so a left–handed person might play on their left shoulder for that reason.
- Other people like to follow the historically documented practice of left hand for treble and therefore place their harps into the left shoulder as that was certainly a tradition in Ireland and Scotland, and Wales too for that matter. There is not necessarily any determining reason for this, it was just the way it was, and once learned it was passed on with each generation. For someone learning the harp from an early age this presents little problem, but if you are just beginning it makes sense to choose the hand that feels most comfortable for the treble or bass. Follow the one that you feel works best for you and with which you can produce your best music.
- Q: I have a very small harp, it doesn’t even reach my shoulder! What should I do?
- There are several historic pictures of harpers, Carolan and Hempson in particular, that show them with their harps more or less in the centre of their chests. There is also evidence that the historic harps were placed on the ground and held into the body more or less centrally. This approach can also work with a small harp that is rested in the lap, where the highest part of the harp comes below the player’s chin.
- Whether you play your harp on the shoulder (left or right) or centrally in front of you, what is most important is that you find a comfortable position that puts you in balance and control, and which gives you freedom without putting unnatural stresses into your body or posture.
- Q: I’ve been told that it is a lot harder to learn the wire harp. Is that true?
- Harder to learn than what? Every instrument has its challenges, and the wire–strung harp is no different. Yes, you will need to learn something about damping, and you may want to learn more about the scales and modes that are particularly useful for diatonic instruments as a way to expand your repertoire. That’s not particularly easy to do. But you also don’t need to play lots of big harmonies because of the long ringing of the strings.
- Q: Can I play wire–strung harp and still play my folk harp?
- Of course. The two instruments have different strengths, and there may be differences between the techniques generally taught for both. However, there are players who use gut/nylon technique on wire, and vice–versa. Some people play both instruments with the nails, some play both with fingerpads, and some people shape their nails so they can achieve a compromise enabling them to use both techniques. A few people use a nail substitute, such as finger–picks, so they can choose to have a nail–played experience on the wire–strung harp and still use fingerpads on their other harps.
- In some respects, this situation is similar to that of a musician who plays both piano and guitar. This musician will either pluck the strings on the guitar with fingerpads, or will use a pick. Some musicians will choose to play the guitar with fingernails and be satisfied with clicking nails at the piano. Also, some finger–board musicians, such as a fiddler, will only be able to grow nails on one hand. (It is generally advised that this person play treble on the harp with the hand that has long fingernails.)
- Q: I was taught to play with my thumbs up, so why do I see so many wire harpers play with their thumbs down?
- One reason you often see wire–strung harpers play with their fingers pointing more directly towards the strings than gut or nylon players is so that their nails will come into better contact with the strings. Of course, if you choose to play with the fingerpads this is not important and you may then choose to use a thumbs–up position.
- Q: I have been told that to be historically accurate I must play with fingernails. Is this true?
- This is partially correct. According to references and eye witness accounts, using fingernails on the wire–strung harp was predominant at least up to the beginning of the 17th century. However, by the middle of that century, the references in Ireland indicate that the number of players using fingerpads had superseded those playing with the nails.
- In the late 18th century, of ten wire–strung harpers present at the Belfast Harp Festival only one was remarked upon by Edward Bunting as playing with his fingernails. This person was Denis Hempson, a player then in his nineties, who “realized the antique picture drawn by Cambrensis and Galilei, for he played with long crooked nails…” (Bunting 1840, p. 73).
- Though in decline, players schooled in the tradition of Irish wire harp playing survived late into the 19th century. Thus there was a period of over two hundred years when playing the harp in Ireland with the finger pads was the dominant tradition. And while hardly “ancient”, the 18th and 19th centuries are certainly historic as we write this in the 21st.
- The collection of virtually all of our harp music occurred during those same two hundred years’ time, so the chances are very good that a tune you want to play was collected from a traditional fingerpad player, so please do not feel inferior in any way if you decide to play your wire–strung harp with your fingerpads.
- The best course of action, and the one wirestrungharp.com encourages, is to accept both traditions as being genuinely historic. Feel free to play the wire–strung harp with fingerpads or nails.
- Q: Won’t it sound different if I use my fingerpads instead of fingernails?
- It will sound a little different. There is a brighter initial strike when the nail is used to set the string ringing. Fingerpads produce a more muted initial “attack” to the note. The sound of the string vibrating, however, will be the same. It is like the difference at a xylophone (or even a better analogy: a dulcimer) between using a hard mallet and one wrapped with wool.
- Q: How do I do to keep my fingernails from breaking?
- The best practices to keep your nails moisturized. If the skin on your knuckles is dry, then so are your fingernails. Some harpers use specialized moisturizes, but often just a good handcream frequently applied will work. Be sure to work the cream or lotion into and around your nails. Also keeping yourself hydrated and eating a good diet can help. Keep track of the times you break a nail: if you were gardening, wear gloves next time. If a nail broke off as you opened a stuck file cabinet, remember that the next time you approach a cabinet and use extra care.
- Q: What should I do if I break a nail?
- Some harpers will use a nail glue or super glue to reattach a broken nail; put a piece of tissue or silk on the nail surface before the glue dries to provide structure for the glue to hold on to. Some harpers (and guitarists) use a bit of a ping-pong ball to fashion a replacement nail. Be aware that these and other ‘fake nail’ applications can damage the natural nail. You might be better off waiting for your natural nail to grow back. File your other nails down a bit in that case to balance out your hand. This makes playing with the broken nail easier, and some people find that doing this makes further breakage less likely.
- Q: I understand that spacing between wire strings is a lot different than it is on a folk harp. Why the difference?
- Spacing of the strings can differ from one maker to another, for just about any type of harp. The reasons for this difference in spacing are varied, some logical and some not so. One reason a modern folk harp strung with gut or nylon would have a wider spacing is that the strings are much thicker than wire, perhaps three times the diameter. Therefore, those strings must be slightly further apart to accommodate this extra thickness. It is the gap between the strings that is the important thing here as the tips of the fingers have to fit between the edges of the strings. If the harp, whether gut or metal strung, is being played with fingernails the spacing can be narrower since only the nails have to fit between the strings.
- Advantages to narrow spacing are opportunities for damping that would be more difficult or even impossible if the spacing were wider. Narrow spacing also expands the harper’s reach. Wider spacing has the advantage of giving the harper more room to reach in between the strings and thus may reduce the amount of unintended buzzing.
- Q: I can’t see the red and the black strings on a wire harp. How would I know where to put my fingers?
- Some players don’t colour their strings at all, and find their way by knowing their top and bottom strings, tracking vibrating strings, finding particular intervals (half–steps, gaps or perhaps two strings tuned identically in the middle of the harp’s range), or even gauging from a mark in the grain of the wood next to a particular string.
- However, most harpers do use colour to at least some extent. If you have trouble seeing your strings and have tried the obvious course of re–applying their colour, there are a couple of things you can try. You can use a brighter colour, say pink instead of red for your C’s or turquoise for the F strings. You can take a fine piece of coloured thread and tie a bit of it high up on the string or down near the soundboard. Some people colour their string shoes or tuning pins. Paint may work better than using markers (try a model paint from a hobby shop). If you decide to use paint or permanent markers, do be very careful not mark the wood of your harp.
- Q: I want to play healing harp music but I’ve been told I can’t use a wire–strung harp. Why is that?
- There are people using the wire–strung harp in healing work. It is true that certain healing harp or hospice programs require that you use one particular type of harp, sometimes down to a particular make and model, while others are more accomodating. There are musicians who use instruments that are not even harps for healing, such as guitar.
Harp Construction
- Q: I heard that wire strung harps need to be made out of willow wood, is that true?
- It seems that willow was the wood generally favoured in the making of the old harps, although other timbers (e.g. Yew, Sycamore —Acer pseudoplatanus and Alder — Alnus glutinosa) are known to have been used as well. And where an intricate carved decoration was required a closely grained wood was selected to hold this fine detail. Willow may have been favoured by the old makers, not only for its springy resilience, but also for its acoustic properties — the soft fibrous nature of the wood soaks up the excessive high frequency overtones that can build up from wire strings and thereby produces a warmer or mellower sound.
- Different timbers have different properties and in more modern times makers have utilised other woods as well, this being especially the case when the old European timbers are not easily obtainable. More information on woods can be found under the Materiality section of WireStrungharp.com.
- Q: Should I avoid using glue when making a clàrsach?
- Not necessarily. The idea that wire–strung harps should not use glue comes from those old harps of Ireland and Scotland which, like some of their gut–strung counterparts, had their soundboxes carved out of a single piece of timber. The joints of these harps were sensibly constructed so that the parts were tightly held together by the tension of the strings. With the addition of a metal strap or two, when required, there was no need to glue anything.
- Contrary to the popular belief that historical Irish harps always had their soundboxes hollowed out, a different picture has been emerging over recent years and it now seems that historically harps with constructed soundboxes were more numerous than had previously been realised. During the 18th century (the time of the famous harper Turlough O’Carolan) harps in Ireland were certainly being constructed that way. Makers of wire–strung harps in Ireland in the early 19th century were also gluing up their harp necks with several layers of wood for extra strength and stability.
- Today makers have a wide variety of materials, glues and construction methods to choose from. If you are trying to make a copy of one of the older historic harps then you should certainly consider following the appropriate construction tradition for that instrument. But if you are not concerned with replicating a specific instrument, you are perfectly free to make your own choices.
- Q: There seems to be a wide variety of sizes of wire harps. Some are big and some small. Why is that?
- There is no standard size for the wire strung harp (or for any harps, for that matter. Even pedal harps come in different sizes). Historically the harps were made individually, they were not produced on a production line, and no two surviving instruments are the same. The maker had considerable freedom in producing his instrument. With no pre–determined design, pattern or template to restrict him, his design criteria were governed by the material available, a knowledge of what worked, and the size and range of the instrument preferred. Today a maker, though he may choose to reproduce a successful design more than once, is still free to explore the potential variety offered without having to conform to pre–set constraints. It is no wonder then that you find harps in many shapes and sizes.
- Q: Can I put levers on a wire–strung harp?
- Certainly, you can install anything you want on an instrument you are making. Levers are a modern invention, something you may want to keep in mind, and even sharping–blades are relatively recent. If you install these type of devices, you will also need to install some kind of bridge or bridge pin. Also be aware that any bend you put the wire through (over a bridge or around a blade) will likely lessen the lifetime of the string. You will also need to install these devices with extreme precision for them to properly sharpen the pitch.
History and Language
- Q: How is a wire–strung harp different from a Clàrsach?
- A wire strung harp is a cláirseach, (Irish Gaelic) or clàrsach in modern Scots Gaelic where the original Gaelic word entered into the Lowland Scots vocabulary at a very early period and the Lowland Scots spelling has now become the standard modern spelling in both languages.
- Clàrsach today generally means “small harp” or “Celtic harp”, especially in Ireland and Scotland. Historically, it seems that clàrsach specifically meant a harp strung with metal strings, and harp was the name for the instrument strung with gut (or, in modern times, nylon or fluorocarbon) strings.
Resources
- Q: Where can I find community?
- There are some on–line communities you can join. WireStrungharp.com has a presence on Facebook. By joining us there you will be among the first to know of any new content on our website. We also host the WireStrungharp channel on YouTube, with playlists on such topics as performance, instruction, and culture.
- Another good way to interact with other wire harpers is via the Wire Strung Harp forum on Facebook.. Please note that you will need to join the group to post comments. Nearly all the people involved with the website here are on that page, along with about 350 other people!
- Q: What is a good place to start looking for help?
- You have found it!